
Trip Report
August 2004. All images are copyright by the original author and ACM SIGGRAPH. Please respect their work.
|
Trip Report |
| Leo Hourvitz August 2004. All images are copyright by the original author and ACM SIGGRAPH. Please respect their work. |
This year's themes at SIGGRAPH:
Art Olson's sketch on using 3D output for molecular biology
Sketch on real-time true displacement-mapped surfaces
Figuring out how the approximate subsurface scattering used on Matrix:Revolutions worked, and how it can work in real-time
Below are summaries of the content-related events I attended.
Facial modeling and Animation [Course]
The Making of "Lord of the Rings": Hero Creature Pipeline [Course]
The Making of "Lord of the Rings": Massive [Course]
Papers Fast Forward [Special Session]
Keynote Speech: When Blobjects Rule the Earth
Careers in Computer Graphics Entertainment [Panel]
The SIGGRAPH Electronic Theatre
Computer-Linked Autofabricated 3D Models For Teaching Structural Biology [Sketch]
Target-Driven Smoke Animation [Paper]
Fluid Control Using the Adjoint Method [Paper]
Simulating Water and Smoke with an Octree Data Structure [Paper]
A Method for Animating Viscoelastic Fluids [Paper]
Real-time Facial Rendering [Sketch]
Image-based Fluids [Sketch]
Leveraging Third-Party Tools for Art-Driven Fluids & Foliage [Sketch]
COLLADA: An Open Interchange File Format for the Interactive 3D Industry [Exhibitor Talk]
Fast solutions to Volumetrics on Matrix Revolutions [Sketch]
Building a Machine City for Matrix: Revolutions [Sketch]
Procedural Petticoats in Shrek 2 [Sketch]
Fireballs in Shrek 2 [Sketch]
The Making of the Superpunch [Sketch]
The Art of SSX3 [Sketch]
Quality Issues in Asset Creation on a Massive Scale for EverQuest II [Sketch]
An efficient production pipeline used to create 52 full 3DCGI anime episodes [Sketch]
Workflow and CG Tools for the Cartoon TV Program "Monkey Turn" [Sketch]
Galilean Invariance for Fluid Simulation [Sketch]
DD::Fluid::Solver::SolverFire [Sketch]
Creating Animations of Fluids and Cloth with Moving Characters [Sketch]
RLE Sparse Level Sets [Sketch]
Next-generation Game Visuals [Special Session including SSX3, Half-Life 2, Onimusha 3]
CC Shadow Volumes [Sketch]
Practical Real-Time Hair Rendering and Shading [Sketch]
Real-Time Skin Rendering on Graphics Hardware [Sketch]
Displacement Mapping with Ray-casting in Hardware [Sketch]
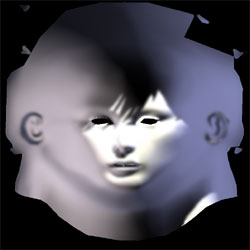
I was only able to make it to a small portion of this course, which seemed to focus mostly on facial scanning and capture rather than facial modeling and animation. The module I saw mostly consisted of Lance Williams talking about the work that they did at Disney a couple years ago where they did an extensive project on facial motion capture. They brought in a professional actor, scanned him, and did detailed facial capture using an interesting optical flow technique that made it largely irrelevant whether they had markers or not. After showing that piece, he talked about the upcoming "Polar Express" movie and how it would really change people's perceptions of motion capture (an making-of piece on "Polar Express" appeared in the Electronic Theatre as well).
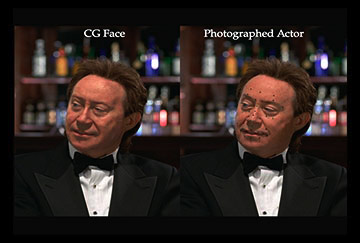 |
I was unimpressed with either body of work in terms of emotional acting - like the movie Final Fantasy, the stills (see at left) tend to look great, but in motion it simply isn't... well, it just isn't. Both the Disney piece and the "Polar Express" excerpt only reinforced for me how inferior the capture was to the original performance -- see my rant at http://www.stoneschool.com/blog/pivot/entry.php?id=12#comm. By comparison, the more hybrid Lord of the Rings work was much more compelling in the end. |
This course went through any number of the sequences and plans for Lord of the Rings. This was truly a fantastic course showing the entire length and breadth of high-end production techniques in use today. There was a lot of material presented, pretty much all of it spellbinding. Below are some of the highlights of their general treatment of "hero" creatures (i.e., main characters).
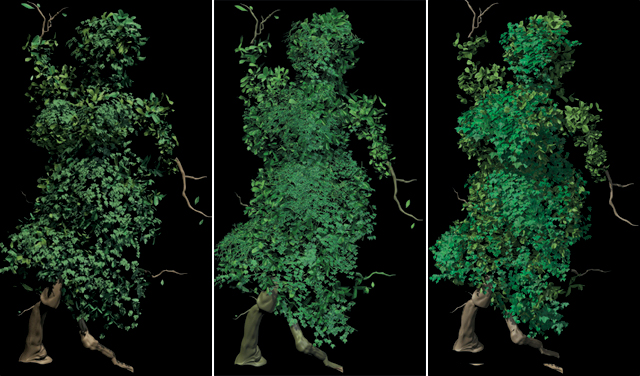
Gollum: They described in extensive detail the long process of defining the Gollum character. Unlike the majority of the hero characters on LotR, which had a pretty linear progression from concept design through modeling (both physical and virtual, in many cases) to animation and texturing, Gollum changed quite a bit. Originally Gollum was more of a "tree frog" -- he was very green in color and had a much less humanoid and more drawn face. In particular, he had far less cheek volume, and his brow was very different offering little in the way of eyebrows.
The first Gollum actually appears in the trilogy -- there's a brief and very dark shot in Fellowship of the Ring where this original Gollum appears. It was modeled with NURB surfaces -- in fact, hundreds of them to keep the surface from breaking up in articulation.
Like most of the hero characters in LotR, Gollum used a muscle-and-skin deformation system. Muscles were defined and attached to specified points on the skeleton. The muscles were given deformations and bulges based on the joint angles established by the animators. The skin was then placed over the muscles. This was also mentioned in several of the PDI sketches as their standard character methodology nowadays.
Then, Peter Jackson hired Andy Serkis to perform as Gollum on the live action set. Andy was a veteran actor, but was hired primarily to assist the actors who spend the most time with Gollum (Sean Astin and Elijah Wood) have someone on set to interact with. As he, Peter Jackson, and the other actors spent more time on set, the director became convinced that Andy's performance "was Gollum," and they began to think of the character as more human.
In the meantime, the animators had been trying to work on the original Gollum character, and they were having trouble getting the range of expressions needed for the second and third films from the limited face designed for the first model. Furthermore, they had now decided to have Andy Serkis play Smeagol in a flashback sequence, so it was important to have the audience believe that Andy Serkis' face to have become Gollum's (admittedly over a period of hundreds of years).
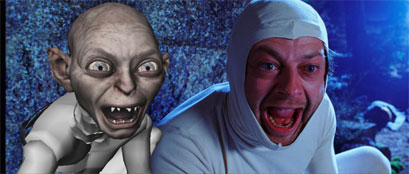 |
After the first film had finished up, it was decided that for all these reasons they needed to redesign Gollum's face -- a huge risk given the schedule. The art department drew a bunch of new versions of Gollum's face, and based on one of them which carried over some features from Andy Serkis', they sculpted a maquette of the new face. Peter Jackson approved this, and working over the Christmas holidays the lead modeler made a new subdivision-surface-based Gollum model. The body was also remodeled in subdivisions. |
 |
Simultaneously, they had been making a lot of paintings and drawing in art trying to rethink the surface appearance of Gollum. The gist of what they eventually settled on was, as the speaker put it, the difference between "tree frog" (the old idea) to "cadaver" (the look that was eventually used in films 2 and 3). These drawing of the new desaturated-but-vaguely-skin-like coloration for Gollum were approved. |
Right about then, Weta was expanding their use of subsurface scattering for shading their hero creatures (see the Superpunch and ATI Face Rendering sketches below for more information on progress in subsurface scattering implementations). They decided to use this on Gollum in the course of implementing the new look for his skin. In addition to painting diffuse color maps, they painted subsurface color maps and maps showing how transmissive the skin was. Eventually they made the subsurface scattered light be mostly reddish in color, and adjusted the diffuse map (towards green) to compensate. The speaker noted that when they were done, the resulting diffuse map looked remarkably like the old-look Gollum from film 1; so that although they didn't realize it, they had in the end mostly been just adding subsurface scattering.
Balrog: They talked about the process of creating the Balrog from the end of film 1. By the time they modeled the balrog, they had the subdivision surface technology working, so that used that for the surface model. However, both the concept art and the director's vision called for a creature "made of flame", and so they assumed they would have to do a substantial system for creating procedural flame.
They actually implemented a complete fluid dynamics flame simulation system for the balrog. It did Jos Stam-style Navier-Stokes fluid simulation for the flames. They showed a single shot of the balrog running up the main hall of Moria, and the results were extraordinary... However. The time required to simulate the flames was simply beyond what they had any hope of doing to get the movie done on time (the simulation took days), and it was proving very hard to direct the simulated flames (see the PDI Sketches talking about "Interactivity == directability").
So, with only a few weeks left before the Balrog shots had to go into production, they started over on the flame part. They basically ended up producing a large number of animated flame textures (many by shooting plates of flame) which they then attached to the Balrog's body (it warms the heart of a real-time 3D person to hear this). They then instrumented these with various controls that allowed the character TDs to direct the Balrog's fire to reflect the emotional content of the shots. In particular, as the Balrog and Gandalf confront each other on the bridge and the Balrog roars, the flames shoot up; when Gandalf confronts it they diminish slightly. This made for a great deal of control and produced the confrontation seen at the end of the first movie (as well as the fight scene in the second film).
Gwahir: Gwahir is the giant eagle seen in film three rescuing Frodo and Sam from the slopes of Mount Doom. They talked about the extensive system for attaching multiple levels of feathers to Gwahir's subdivision surface body. In spirit this was very similar to the system we used at Pixar to attach feathers to the birds in "For the Birds".
This part of the Weta mastercourse covered their crowd animation software, Massive. I had never seen a demo of Massive before, and to me (and most Maxoids in the readership!) the most interesting thing was comparing the way Massive works to the way we use Edith to control virtual characters. Although I hadn't really thought about it beforehand, the problems are remarkably parallel.
Massive is trying to make sure a huge cast of background characters behave in a plausible, but not necessarily completely predictable, way. It incorporated a lot of "sensing" information about what that particular virtual character can see at any time. And like Edith and The Sims, it had a lot of very funny outcomes (the first time they turned it loose on one of the big attack scenes, the outnumbered army turned and ran. Logical, but not very good for the film's script!).
One thing they did that's very applicable to a current tools discussion within Maxis has to do with the separation of animation state versus AI. They had a very complete separation of the animation state editor (where you define what animation states are possible and how to get in between them) from the AI (which spent a lot of time dealing with the sensor loop and what other simulated agents were doing).
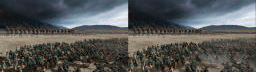 |
A great hack for locomotion they put in to make the giant battle scenes tenable was that they could paint flow fields on the terrain. The massive agents would then flow along the prescribed field unless something dramatic happened nearby (like them getting attacked). This was used for many of the large-scale shots in the second and third films. |
If you haven't heard about it, Massive has now been spun out of Weta as a separate company and is selling the software on the open market.
This has been my favorite session at SIGGRAPH since it was established -- it clearly sets the record for density of information presented per minute! Each author of a SIGGRAPH paper has one minute to present what their paper will be about, and so you basically get a capsule presentation of every SIGGRAPH paper. Many of the authors try to be funny/witty, with varying results ;-).
I didn't go to many papers presentations this year, because there was always something else to do, and also because for papers you can always read the paper when you get home; whereas with sketches, the conference will be your only chance to get the information. Below is a summary of the papers I didn't attend but am particularly interesting in following up and reading based on their fast forward minute.
This year's keynote speech was by science fiction author and futurist Bruce Sterling. First off, the guy was a really good speaker: he engaged the audience, had done a little bit of background reading on the group and amusingly worked some of the SIGGRAPH organization values into his speech (I liked that, I helped write them!), and he varied his speaking volume and cadence a lot.
His speech was interesting as well, although not as far-reaching as you'd expect a futurist to be. He had two major themes: the blobject idea was about how blobjects (the current design trend for curvy, blobby things such as the new VW Bug) are a direct descendant of the CG and graphics techniques that enabled them to be practical. The second, more general, theme was the more general one of thinking of the real world as something that nowadays only comes after it has been conceived in some computer memory. While I didn't have my world rocked by any of this, it was a good, entertaining and discussion-provoking hour.
Rachel Falk from PDI moderated this panel that EA's Bob Nicoll spoke on. In general, the speakers all emphasized the same things: teamwork and communication skills; and base art skills. There was the usual nuanced difference between the larger shops (which are looking for more specialization) and the smaller ones (which are looking for generalists).
Personally, this was not one of my favorite years for the Electronic Theatre. Much of the humorous, student work I was used to seeing wasn't there, and there was relatively little technically oriented content. Nevertheless, it was inspiring to see what was new and breathtaking. Below are some highlights (note there were many other pieces that are discussed elsewhere or nice but not needing comment). I have the DVDs containing most of the Electronic Theatre and the Animation Festival, and I'll schedule lunchtime showings over the next few weeks.
 |
|
 |
|
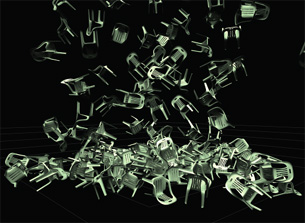 |
This was probably the coolest thing I saw at SIGGRAPH this year. At Scripps Institute and many other places, molecular biologists have been using stereo displays and computer graphics for 20 years to study the shape and bonding possibilities of molecules (the Principal Investigator behind this sketch, Art Olson, has been contributing to SIGGRAPH for about that long).
A couple years ago, they realized that with the relatively cheap 3D printers that were available, they could begin to take the virtual models that scientists were making and print them out. That was relatively easy, and the scientists at Scripps have been requesting models since then. However, they came up with two really cool observations to extend that basic idea.
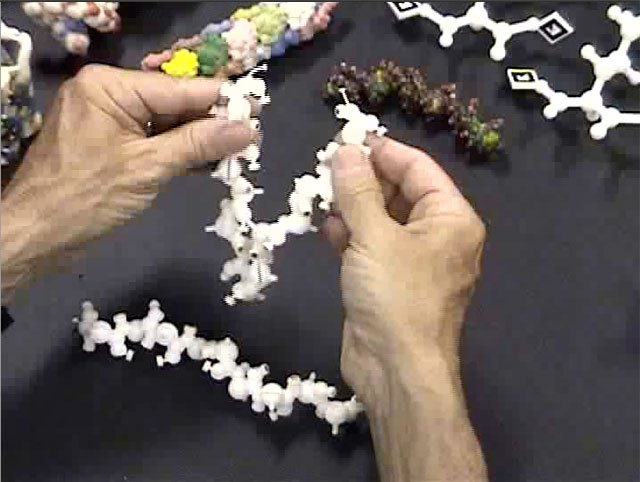
First, they realized that since the 3D printers have sub-1mm resolution and that they're printing out of ABS plastic, which is reasonably tough, they could print ball joints. In particular, they could start to print models that were articulated, and provided exactly the same degrees of freedom as were observed in the real organic molecules. Furthermore, they could print little cups into the hydrogen atoms in the printers, and after the model was done they could insert small magnets so that the models would bond in the same way as the real molecules. Above is a video still of someone manipulating a peptide chain model they made. In particular, because this peptide chain mimics the real folding and bonding properties of the real thing, these models can be assembled into a protein wall.
Secondly, for the more static models, they realized that by putting a little flag with a standard symbol on the models, they could use image recognition with any old webcam or whatever to recognize the position and orientation of the flag -- and thus use the model and the camera image of it as input. Not only could the molecule be positioned in this way, but they could augment the model by video-keying virtual information over it. Two great examples were shown (the system runs just fine on a laptop): one was displaying the electrostatic field around the model while the user held and manipulated the model; the other was to have the user holding a model of a carrier molecule designed to deliver drugs, and show the various possible payload molecules virtually inside it. One of the coolest things about this was that because the exact geometry of the model was known (it was created from the computer model, after all), they could accurately have the real model hide the virtual model -- they just left that part of the virtual picture out.
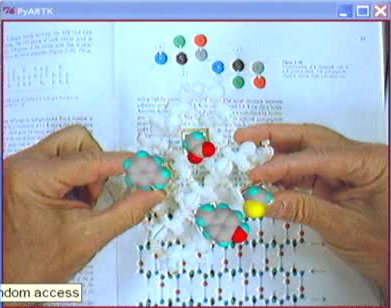 |
Here's another example of augmented molecular reality: the user is holding the peptide chain model all folded up, and the system is flashing various possible bonding molecules (the colored ones) as the chain is manipulated. Like I said, I don't know how this is immediately applicable to computer games, but with EyeToy and next generation platforms, there may be opportunities to do expand our current definitions of interactive games! |
This paper followed up on last year's "How to make a fluids-based smoke simulation hit specific target shapes" with "How to do that more efficiently." Good work if you need to do that, but not super-interesting to rehash.
Although dryly mathematical, as a demonstration of a method for potentially speeding up fluid dynamics calculations quite a bit, this paper was very worthwhile. Like all good computer graphics math, it consisted of dusting off some 18th century mathematics for implementation in C++.
People have thought for awhile that doing fluid simulations on an adaptive-resolution grid would be a good idea. It is! However, there were quite a few tricky edge cases to handle in getting it all working.
Viscoelastic fluids are things like slime or clay, that flow slowly and with some elastic limit. James O'Brien's lab shows us how to simulate those, too! Although I didn't specifically mention it above, this paper spawned a cute technical piece in the Electronic Theatre, "Gratuitous Goop."
Like all of PDI's sketches this year, a lot of what they talked about in this sketch was how to make fluid simulations be controllable and directable to satisfy the story needs of the project. One of their mantras, which was picked up and repeated a lot, was "Interactivity == Directable"; that is, what makes some technique directable is that the iteration time for the artist is low, allowing them to do enough iterations to achieve the creative goals of the technique. Several PDI and other high-end speakers discussed the problem that if the turnaround time for something is too long (say, overnight), you won't be able to iterate often enough to fulfill the project's creative needs.
The other cool trick I picked up in this sketch had to do with how to assign a stable UV map to a fluid. They were doing the mud simulation in Shrek 2, which used a real fluid dynamics simulator; but for artistic reasons they wanted to put a hand-painted texture map on the mud. You can't just assign texture coordinates to the vertices of the result, both because it was a level set and because even if it was a height-mapped grid, if you assigned stable UVs to the verts, the vert wouldn't move as the fluid simulator pushed the fluid around.
The way they solved this problem relies on either doing the fluid simulation with particles in the first place (which they were, since it was a particle level set system), or injecting fluids into the system (like ILM did in T3). Either way, once you have the particles moving around in the simulated fluid, you pick a reference frame and paint a texture map on the fluid surface at the reference frame. Then, you assign each particle a color based on the particle's position at the reference frame: the R of the color is the U position at that frame, and the G of the color is the V position at that frame.
Now, to draw the texture at any other frame, you render a picture from the projection camera (that's why this only works for generally planar things) by drawing all the particles. You have to dilate the image to fill in any holes. After you've done that, the R color at any pixel of the rendered image gives the U value to use there, and the G color gives the V value. You can render the warped texture map directly with a texture indirection, or assign these UV coordinates to the verts of the surface mesh.
This PDI sketch had a good hack for drawing a sparse set of volumetric data: rather than imaging the voxels directly, they went through the voxels and based on the density of the voxel, emitted a variable number of particles randomly distributed within the voxel, with velocities determined by the flow field in the voxel. Although this was much less accurate than the true volumetric rendering, if the voxel data was sparse it was so much faster that they often ended up using it in production; they could get many more iterations this way (see above comment about Interactivity==Directability!).
They used Maya Paint Effects to get a artist-controlled, very directable distribution of foliage. Because direct Maya renders of Paint Effects geometry had so many issues, they designed a fairly painful system for extracting the hooks generated by Paint Effects and turning them all into their renderer's equivalent of DelayedReadArchive hooks.
To get the foliage to sway in the wind, they would run a Maya fluid simulation of wind, then simply displace the CVs on all the generated geometry by that simulation data. This was one of many instances of using Maya as a front end to some other process, simply because the artists knew and could work efficiently with the Maya interface.
This was one of the many sketches where the solution these high-end VFX developers adopted seems like it must have an extension to real-time use -- even though their frame times for the specific techniques were still way too slow for interactive.
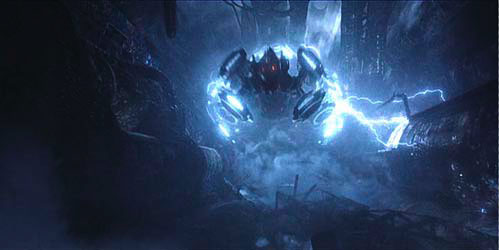
Tippet Studio was hired to do a number of sequences for Matrix Revolutions that involved low, clingy ground mist. The mist had to conform tightly to the set geometry, but also get pushed around by the ships and other objects. And, the camera would often fly straight through the mist. This all meant that having something which could be easily motion blurred, and would render fast, was essential. See the sample image below.
They decided early on that they could get the look they wanted for the gases by defining scalar noise fields that had a number of octaves of fractional Brownian Motion (fBM). However, how to render it? They tried a ray marching where you accumulate density along each ray of a noise field -- too expensive, and didn't motion blur well. They tried particles where the density of the particles depending on the noise field: that was too memory intense to get the detail the directors wanted.
The way they ended up rendering it was to put texture-mapped cards into the scene (semi-manually). The texture on the cards was procedural, and essentially was a closed-form analytical evaluation of the line integral through the fBM field from the previous card to this card. They listed a lot of advantages of this technique:
Of course, it had some downsides as well:
Rendering details: to blend between solid base and wispy peak (as desired by
the directors), they actually blended the fractal parameters rather than blending
the output. In order to fade off the top without getting a straight edge, they
fade off each noise element of the fractal noise whenever it's midpoint hits
the desired fade edge. Since the different octaves were faded off independently,
you don't get an even top edge.
For lighting the gas, they took the derivative of the density to determine a
normal, and stored that in the card texture. Using that, they shaded each card
both on the front and on the back with a backlighting term, and to get the light
passing through the gas it turned more transparent when it was backlit. Because
they had the card geometry, they used that as a shadow-casting element so that
the shadow-casting worked fine as long as the light source wasn't in between
the cards.
For production reasons, they had to render the gas as a separate pass from the ships passing through the gas. They rendered a depth map for the ships and then had the shader calculate the portion of the gas that should be removed from the volume before rendering. Both to anti-alias this and to handle the cases where a ship flies through a card, they took multiple samples of the depth map, and also spread the samples out more if they were near a ship.
Rendering time per frame were 40 seconds for video res -- 10-20 minutes for film res. It had a 150-200MB shot footprint, which was important since they were using workstations at night for rendering (there was no Render Farm available at Tippett when they were doing this work).
This was also a Tippett sketch, and basically came down to a procedural modeling sketch. Although none of the individual techniques were incredibly innovative, the level of detail and the various kinds of procedural modeling that went into it were interesting (especially the "pipe-layers", a level of procedural modeling that created the vast networks of cabling along the ground which connected and served as the placement guides for the buildings).
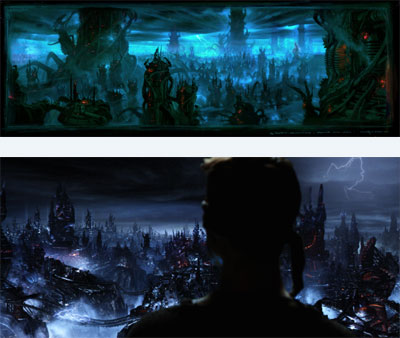 |
Like most of the production sketches, this one started with the concept art from the art director, talking about the various techniques and technologies applied to the problem, and then showed the final result and compared it to the concept art. At left, the concept (top) and final (bottom). |
This was a nice, well-contained sketch about a very specific problem. On Shrek 2, the Fairy Godmother had a dress which was simulated by the Character FX department using MayaCloth. However, her character design also called for her to have petticoats with half a dozen or so layers in cloth in between the dress and her legs.
All the known solutions to this looked ugly. As you know if you've ever tried to use a cloth simulator, it's impossible to get stable results when 4-5 layers of cloth are squeezed together like that. A simple inset surface wouldn't solve the problem either, since the cloth simulator gives rise to complex topology, and an inset surface would frequently self-intersect.
The solution Matt Baer eventually arrived at (after a hallway conversation with a colleague suggested it) was straightforward. He ran a sphere-packing algorithm to fit the largest radius spheres possible into the space between the dress and the legs. Then they generated five surfaces even spaced between the centers of those spheres and the place where they touched the outer garment. This was fact, guaranteed to not intersect either the legs or the outer garment, and has no physical plausibility whatsoever!
This sketch described the fireballs used in Shrek 2. It was interesting but no real nuggets of wisdom came out of it: they used an extension of the volumetric flame system they wrote for Shrek along with some new bells and whistles.
This was one of the most anticipated sketches of the conference: an entire 20-minute presentation about a single shot from Matrix: Revolutions (the final "superpunch" Neo delivers to Agent Smith). The amount of work that was put into this single shot was unbelievable. The shot was conceived very early in the production, but serious work didn't get going until about 90 days before finaling. The vision from the directors was a fantastic distortion that would impact on Smith's face after a fascinating camera track, and include "bullet time" visualization of the rain impacting on Neo's fist.
In order to get the key part of the shot -- the distortion in Smith's face -- they sculpted a custom maquette of the final, distorted shape of Smith's face. They then digitized this maquette. They laser-scanned the actor, and in addition captured a facial performance from the actor to use as the beginning of the fist impact. They set up the scanned maquette surface as one of the blend shapes on this face. The lead animator then sculpted a whole series of other blend shapes to use as Neo's fist impact. Then, they added in a series of ripple deformers to create ripples moving out from the fist across the face.
After that, they began working on the other elements of the shot. The complex camera motion had been established. The fluid simulations of Neo's fist hitting each of the many raindrops it encounters in the shot were performed. The lightning strikes that occur during the shot were choreographed and lit. Subsurface scattering on the flesh -- in particular Smith's face -- was simulated (see the discussion of "Real-Time Skin Rendering on Graphics Hardware" -- amazingly, the way this was done is practical for real-time implementation). The streaky rain (rods in mid-air) were added.
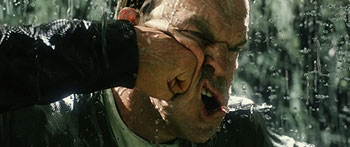 |
The final shot is great. The VFX supervisor in charge of it, George Borshukov, now works for Electronic Arts. Somehow the still at left ended up flipped left-for-right (the shot is actually the other way). |

Collada is a new format specification, sponsored by Sony but with support from all the major tools vendors. Collada aims to be a format for source artwork that can be used with any of the major packages. My belief (similar to others I've talked to) is that if the tools vendors continue to support it while it gains the necessary features, it will eventually be a great productivity win.
To support their goal, Collada has the following features:
They're working to support skinning, morphing, and animation in the future; right now the focus is on static models such as environments. The Collada Web Site is www.collada.org, which is very informative (it has the complete presentations of everyone who talked at the show). Max, Maya, and XSi all have importers and exporters already; also, Sony provides an open-source Collada viewer. Visit the site to learn more about Collada; it could be a major win in the future.
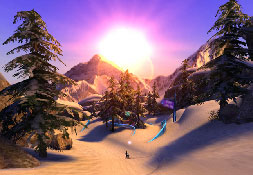 |
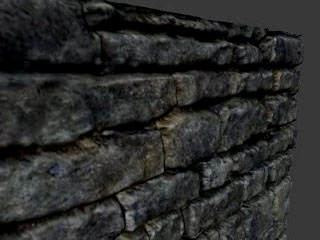
This sketch was by Henry LaBounta from EA Canada. The biggest thing I learned from this sketch is that SSX3 is beautiful! (I haven't played it yet). I knew that they were using Mental-Ray for prelighting their environments and it was helping them a lot. There were a few other things I didn't know about, though. |
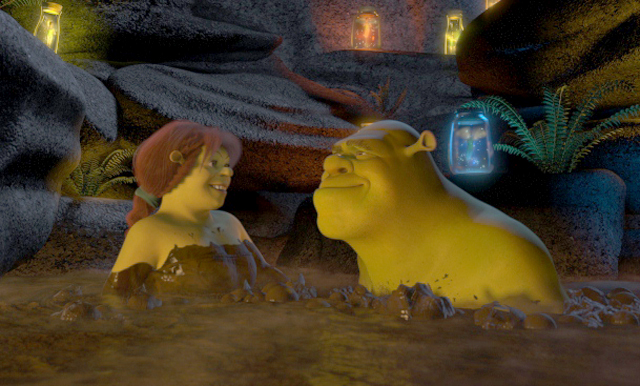
I had no idea how much they relied on having a postprocess glow effect implemented on the scene -- that helped out their scene integration tremenously. In particular in the cave scene it really brings the image together. Also, they color-timed each course after it was otherwise complete; that is, they established an overall tinting color for each section of the course. In particular, when you're in the cave they give the visual impression that you've "opened up the lens", and then it stops back down after you come out of the cave. Finally, they really did a great job of integrating some classic matte paintings made by a matte painter Henry had working with to make the world feel huge and open. This presentation was virtually identical to the one Henry gave 90 minutes later in the "Next-generation Game Visuals" Special Session.
Frankly, I didn't learn a lot from this sketch except how heavily EQII relies on normal maps, and just how big it is. He had a DVD looping brief screenshots of models (objects and characters) from the game, and it didn't loop until his 20-minute presentation was done. It was an OK sketch, it just didn't have anything that needs repeating.
This sketch was by Sunrise, an anime studio from Tokyo, and discussed the making of SD Gundam, which was created entirely in 3D CGI. The schedules of Japanese television programs make even television schedules in the US seem absolutely leisurely; they had about 18 months to complete 26 hours of animation with a crew of 30.
The animation was partially motion capture (they established a new studio for this). However, they also made some striking changes in the production pipeline. They eliminated the layout department, and instead went straight from storyboards to animation. Even more interestingly, they took the custom toon shader they had written for doing final output and reimplemented it in Cg so that it would run in real-time on their animator's workstations. By combining this and pre-lighting each sequence, they were able to have the director final sequences while standing at the animator's workstation; the rendering department was then truly hands-off; the director did not check the footage post-rendering.
Another sketch from Tokyo about a modified production pipeline for accelerated TV production was presented by OLM Digital. The program "Monkey Turn" is about single-person boat racing (more-or-less like jet skis). The core of each program is the race itself, which is about ten minutes of CGI footage. They developed a toon shader as well, which resulted in beautifully integrated CG footage which looked very appropriate in context (IMHO, "Monkey Turn" solved this problem more successfully than "SD Gundam"; see the still below).
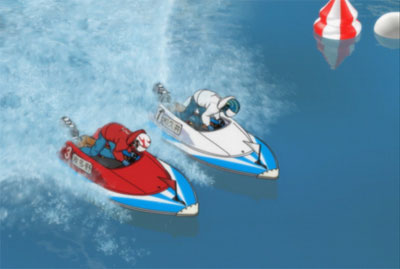 This is a fully-CG scene |
The most interesting part of the sketch to me was their changes to the production pipeline. They were very concerned that they would not have the time to complete the 3D sequences following storyboarding of the episodes (TV productions in Japan don't work very far ahead of air date!). So, since the series is based on a manga (comic book), they chose to animate the race in 3D based on the comic book before storyboarding. Once the race animation was complete, including lead changes, boat oscillations, and splashes and wakes, they would receive the storyboards and go "location scouting" in the completed race looking for the shots called for by the storyboards. |
They also developed a series of MAX Script helpers to lay out and animate the race very quickly. Most of the splash and wake effects were sprite cards; they used hand-painted animated textures on these cards though, again in order to integrate with the "cel look" better.
It was very gratifying for me to see both of these Japanese presenters at SIGGRAPH. Needless to say, preparing and submitting a publication in a non-native language is a lot of work, and I visited both of them last May in Tokyo to help them prepare and urge them to practice. Both of their sketch presentations came off really well, and Ronen Barzel, the sketches chair, came up afterwards to congratulate OLM Digital on their work. Congratulations to both!
This sketch from Rhythm & Hues was about a straightforward idea: When running a fluid simulation, instead of using a voxel grid fixed in space, use a traveling voxel grid that automatically encompasses only the cells with nonzero fluid density. Their fluid simulator is fairly standard, it's an implementation of Jos Stam's semi-Lagrangian technique from SIGGRAPH 1999. However, applying a fancy-math-principle called Galilean Invariance means that they show the Navier-Stokes equations can still hold for moving frames of reference, and thus they get a integer-factor speedup (and reduction in required memory) for running the simulation (the particular simulations they were working on were explosions, although anything that required Navier-Stokes simulation could benefit from this work).
This was about Digital Domain's implementation of a Jos-Stam-style fluids solver (not unlike the previous one). As you might guess from the title, it was implemented in C++. It was an OK sketch but didn't really contain information that provided new insight (it did, obviously, confirm how completely Stam's paper changed the development of fluids code in the high-end effects field).
This sketch was from Toshiba Corp. and talked about implementing a simulator that simultaneously simulated both the cloth a moving character was wearing and the water hitting it (basically, a moving character got hit with a hose). I didn't find their results to be particularly impressive, however they did get the point across that the kind of situation they were showing really does, in general, require both simulations to be run at the same time; the fluid exerts pressure on the cloth, and the cloth pushes the fluid around (so, you can't simulate either one alone first).
This sketch was from Frantic Films, which did the Tar Monster in Scooby-Doo 2 (What? You mean you didn't see Scooby-Doo 2?!?). The creature is actually pretty interesting, it's an animated character which sheds liquid via a fluid simulator the entire time it's onscreen (see below).
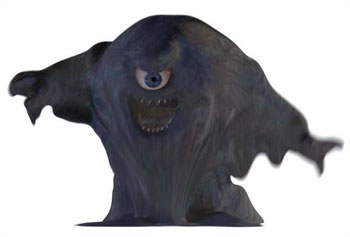 |
These guys seems to understand their level sets pretty well, they did another separate sketch on the Tar Monster as well as writing an interesting white paper about using the GPU to speed up their level set implementation. Anyway, this sketch was very simple: they showed you can dramatically decrease the memory footprint required for a level set data structure by using a particular form of run-length encoding optimized for the nature of a level set. It had very little impact on performance as well. |
This UNC sketch was about various way to optimize shadow volume scenes. The results still consisted of hard-edged shadows and still had a strong dependency on scene complexity. And, their techniques mostly required more per-frame scene optimization on the CPU, something that isn't a good most game architectures.
This sketch from ATI was about how the rendering Ruby's hair in their new "Ruby: The Double-Cross" demo. Frankly, I wasn't super-impressed with the hair in that demo (I think a lot of our Sims 2 hair looks better). The one thing that was kind of nice is the anisotropic hair shader they implemented, but in fact that still had it's limits because it caused them to use overscale hair follicles. Much of their sketch concerned an attempt to resolve polygon ordering; they hadn't thought of using the a-priori poly ordering we use on Sims 2 until the plane ride to the conference!
This sketch from ATI was about implementing the subsurface scattering technique that was used on the Matrix: Revolutions "The Superpunch" shot in real-time by relying on UV space as a measure of nearness. Surprisingly, this turns out not to be that hard, and their results were pretty good even though they missed a couple places where they could have improved them even further with some artist controls (see below).
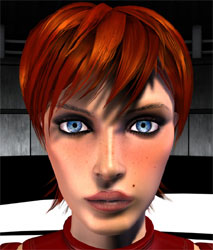 |
At left: Ruby's face with the skin shader. It looks somewhat better in motion, and really needed some artist-controllable constants. At right: The diffuse illumination map (see below). |
 |
One of the big things they missed here was that they didn't allow an artist-controlled constant for the color of the subsurface-scattered light as distinct from the direct light. I asked them about it afterwards to verify they weren't doing it; it should make the subsurface effects stronger. It can be done pretty much for free in the blurring step, it's just another multiplicative constant.
If the Molecular models sketch was the coolest thing I saw at the conference, this one is probably second. This sketch from the University of Alberta presented a way to do real displacement mapping on graphics hardware.
 |
At left is the basic result: a plane with real displacement mapping. Note that this is not bump or normal mapping; it's true displacement mapping. The silhouette edge is correct, and there are internal occlusions from the displaced surfaces, neither of which you get from bump/normal mapping. The trick to this is pretty much what the title says: it's doing a discretized ray cast within the volume of the maximum displacement in the GPU. The movie that comes along with the sketch has a pretty clear diagram about what they're doing.
|
As they completely acknowledged in their sketch, this work is not really done. Right now it only works for planar surfaces, and although they have a plan for how to extend it to arbitrary polymeshes they haven't actually done the work (they did show a demo at the sketch of the above displacement map on a cylinder). The performance on a Radeon 9700 was pretty good (130 fps full-screen), although the extension to general surfaces will probably impact that.
Henry Labounta from EA Canda organized this special session. He gave his SSX3 presentation first (see the description of the nearly-identical sketch above).
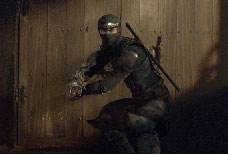 |
The Onimusha 3 cinematic was one of the highlights of the SIGGRAPH Electronic Theatre this year. Although it was a bit over-the-top for me, it was definitely raising the bar for intense martial-arts action. The speaker discussed the procedures for making the piece, and by far the most interesting element was watching the on-set video taken during the motion capture sessions. |
It turns out the action from the cinematic was all actually performed by the motion capture actors. They built spectacular scaffolding on the shoot to perfectly mimic the eventual models, and brought in both Hong Kong stuntmen and Japanese kendo experts to act the motion capture. The intensity of this piece came straight from the on-set performances. Allegedly this cinematic had a crew of 280 people.
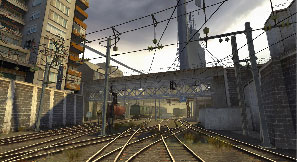 |
Half-life 2 continues to look really good and very compelling to play. Showed a lot of concept art-to-game comparisons, where the primary thing they didn't hit was the glow effect. This was particularly obvious coming just after Henry's presentation of how effective the glow effect was on SSX3. |
They tried to use a number of non-standard shaders; for instance, the Combine (the aliens in HL2) has a different set of shaders which reflect differently.
Talked about HL2 art. They put a fresnel term on the reflections, even on the walls, so that the reflection dims as you move away from the viewer, to avoid the plane-reflected-all-at-once effect.
Half-life 2 has lots and lots of NPCs; the NPCs give a greatly heightened sense of the fact that the story is going forward with or without you. The NPCs all look at you and talk to you with kip sync. While the lip sync isn't always great, again it changes the sense of the relations between you and them considerably.
He said that they almost always create normal maps by modeling the extra detail and then extract the normals maps from them; they occasionally paint one but they usually want the extra veracity of the modeled detail.
Both on Half-life 2 and SSX3, the thing I really noticed is that the shading/lighting on characters was noticeably below the quality of the environment. Probably this just reflects the reality that the environment can be pre-lit, but the characters not only are skinned but also must be lit in real-time.