Well another year of SIGGRAPH has come and gone, and once again it's time to write down the noteworthy things I saw and did... Here's a table of contents, or you can just scroll! I tried to put the more interesting things to write about in the front (highly subjective!).
The title of this sketch is a bit misleading; the models he's using here are more complicated than a simple billboard or billboard cross, but the real point of interest in this sketch is the lighting technique for foliage. To start, he takes the high-res model of a tree and constructs a spherical harmonic approximation (I think at each vertex of the high-res model) to the incoming light. Note that this can capture ambient occlusion, translucency of the leaf and the leaves around it, etc. Normally this is done against a sky dome.
Next, he uses the work of Colditz et al on constructing good Billboard Cloud models for trees. This work constructs a reasonable polygonal approximation of about 600 polys from an input high-res tree model. When creating the textures to put on the billboard cloud, he interpolates the values associated with the SH representation of incoming illumination across the original polygon and samples that into the billboard texture (and also constructs a normal color map). So the billboards have a set of SH lighting coefficients and a color and alpha.
In the fragment shader at display time, the sunlight is shadowed using a standard shadow map, and then combined with the SH solution for the incoming light. The result is lit with the diffuse texture. The result is lighting that retains all of the complex interactions within a tree, and uses the shadow map to account for tree-to-tree and terrain-to-tree interactions. In his sketch, he didn't do LOD, although LOD in this situation is subject of a longer Eurographics paper this year. |
 |
| His demo consisting of flying around in a 60,000 tree forest at 15-20fps on a laptop with changing lighting conditions, see the images at right. Although not in the notes, I believe he's also varying to overall color of the light as a multiplier on the SH incoming illumination. Check out this link for more information. There's also a video referenced at the bottom of the link; his demo looked like the tree in the first of the two videos. The second video has a "blocky-tree" effect that wasn't in his demo. |  |
The biggest problem he noted with his technique (besides the fact he hasn't implemented LODs) is that the mipmaps for the trees often drop out and make them have incorrect silhouettes. This is definitely true in his movies, and kind of intrinsic to alpha-mask-style drawing.
This was presented by Secret Level, the small SF-based game developer. They wanted to have a lighting tool for next-gen that would let their artists do global illumination pre-lighting on their own workstation and combine well with a next-gen lighting runtime. To get that, they wrote their own implementation of photon mapping as follows.
Before starting photon mapping, the artist places a low-res lighting map across the scene. Like all lightmap schemes, this map should have texel density where areas of rapidly changing lighting are expected to be found; but instead of containing an actual result of lighting calculations, this map will contain a spherical harmonic approximation to the incoming illumination on that texel (they used twelve components in their SH approximation).
The photon map algorithm (with the final gather optimization) proceeds, emitting photons from light sources and chasing them through diffuse or specular bounces in the scene. However, when the final surface is reached, rather than remembering the photon position for later calculations as in Mental Ray, the photon is treated as an infinite directional light source, and accumulated into the texel of the spherical harmonic light map at the final gather location. The huge implication of this is that the amount of memory needed for the prelighting is constant with the number of photons. Thus, when you turn up the number of photons to get a smoother lighting solution, the preprocessing time goes up but the memory requirement doesn't.
They still have to do nearest neighbor searching at the completion of prelighting in order to normalize the accumulated irradiance; however, they only have to keep a kd-tree of texels rather than photons. Since the texels are fairly low-res the density estimation part of photon mapping is also much faster.
 |
Because they've stored the incoming illumination rather than the result of lighting, they can apply normal mapping and then do the final lighting calculation based on the SH components in the fragment shader. At left is the scene they had used to develop this. The best quote in this sketch was, "The focus of the research is on putting rapid iteration in the hands of our artists." |
One last thing: they highly recommended the GDC presentation "Spherical Harmonic Lighting: The Gritty Details" by Robin Green for anyone implementing SH lighting.
Bump Mapping Real-world Objects (Sketch) |
BEST HACK OF SHOW! |
A Japanese printing company (Dai-Nippon) figured out how to make a flat piece of plastic respond (anisotropically) to lighting as though it were bumpy! The piece of plastic in the photo at right is completely flat. What they do is start with a 3D model of the desired appearance. They project the normal into an assumed key light direction and take the length of the projection in order to define a scalar field across the plane. They then define thousands of streamlines by seeding positions in the plane from a jittered grid and allowing them to flow along the tangent direction of that scalar field. The successive positions become spline control points; when the splines are rendered with variable-width lines the result is a set of streamlines covering the sheet whose direction is based on the original 3D model. |
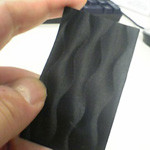 |
They then etch a plate which can print these lines into the plastic sheet (quote: "We're not interested in a technique unless we have a way to make one million copies of it cheaply"). The result is a locally coherent fresnel lensing effect which gives an approximation of how the original 3D model would respond to light. Not every example worked -- in general, I would say large-scale features of 0.5cm or so worked better than their attempts to do small-scale textures like cloth weave, but it was way cool when it worked (their image above gives a very good idea of what it's like to hold it). Unfortunately there's no URL for this, and besides, it's not really cool until you hold it in your own hand...
Tenori-On (Emerging Technologies) |
MOST FUN! |
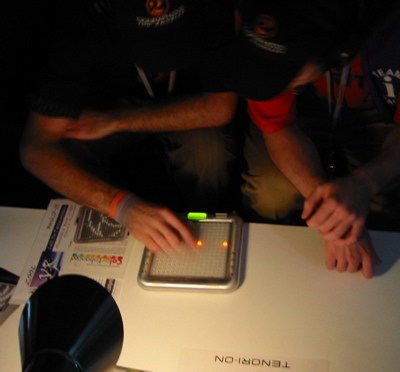
Tenori-On is a new musical instrument created by artist Toshio Iwai and Yamaha Corporation. The front of the device, seen at right, is a 16x16 array of buttons, each of which has a white LED inside (the LEDs shine through to the back although the back isn't touch-sensitive). In the basic mode, touching one of the buttons makes a tone; height up the device determines the note, and there's a scroll wheel for varying which voice is used. The instrument gets more interesting when you realize that if you press and hold the button, that note will be 'locked in' to the loop you're creating. Position of the button right-left on the instrument determines at what time during the loop that note will be emitted. The voice can be changed from note to note, so you can lock in multiple instruments at once. Note: the LEDs are actually pure white, don't know why they came out orange in the photo. |
 |
 |
It's not just audible feedback, though. When you hit a button, a little pulse of light spreads out from the button you hit before dying away. The same is true (on both front and back) of the press-and-held pulses, so as you build up a more complex track there's an interesting visual and audio pattern forming. Then, to increase the complexity, there are actually four tracks available, so you can do the same thing on each of the tracks. And, all of that is just in the basic 'loop' mode -- there were several other modes available that I didn't quite have time to figure out. I spent at least half an hour playing with Tenori-On, and I would have spent longer but it seemed kind of impolite to all the people waiting to play! It was definitely popular with everyone who tried it, and Yamaha claimed they're definitely hoping to actually complete development and bring Tenori-On to market. I can't wait, I'm definitely convinced I want one of these to play with. They may be a ways out though, I think the prototype units we were playing with were actually just a controller sending MIDI to a PC in the back room to synthesize the sound. |
There were very nice little pamphlets and instructions produced by Yamaha to guide people through playing with Tenori-On. They gave a link to the Tenori-On Web Site, and listed someone in particular to contact for follow-up: Yu Nishibori, whose email address is nishibori at beat dot yamaha dot co dot jp.
This was a sketch by Digital Domain about the terrain work they did for the movie "Stealth" (remember: quality of effects != quality of movie). Last year they presented quite a bit of stuff about their special-purpose terrain renderer. One of the most unusual things about it is that the renderer requires the terrain to be completely procedural: the terrain they're trying to render is so large (they have done a number of continuous shots that move from space to ground) that they don't actually generate the mesh until each pixel is rendered (in order to get control, you can specify height fields that apply at various scale to various parts of the terrain, as well as lots of other data like the path followed by roads). It's a kind of trippy concept that the mesh doesn't exist until render time.
In last year's version of the renderer, they had to write specific shader code for every combination of data effects they wanted to achieve in the show. For "Stealth" they knew they had way too many shots and variations to be able to do that, so they wanted to build an artist UI.
The primary thing they did wasn't so surprising: they built a visual shader programming system a la Maya's HyperShade or Shake. There were defined data types that could flow along the graph edges, and the nodes themselves ranged from low level (addition, dot product, noise) to high level (height field, "road"). The shader networks quickly grew out of all control (of course, they showed the example of the 1400 node shader network that included multiple branches for different LOD treatments).
They had a couple of interesting comments about managing this kind of system across a number of artists. One was that in essence they were making an interactive procedural modeling tool, so one of the tools they had to add this year was a variety of primitive nodes (spheres, cylinders) that allowed sub-networks to be applied only to the portion of the terrain inside the primitive (with a soft falloff, obviously).
More importantly, they spent a significant amount of time creating multiple ways of quickly visualizing changes in the shader network. The most important of these was to be able to debug the network as it grew, for which they came up with the idea of a preview camera node. This was a node you could attach anywhere in the network to preview only that subset of the network in a separate window. It took a while to make this flexible enough to deal with any data type in the network, but they said after awhile the artists would essentially keep this open all the time -- and that they used the 2D previewer as often as the 3D one.
The second point they made was that last year they spent a lot of time figuring out what high-level nodes to build. This year, they let everyone loose with the system, and watched out for widely used sub-networks. Whenever one of those showed up in a lot of shots, they simply combined that sub-network into a compiled high-level node, which was easy because they already knew what it needed to do and what the input variable parameters needed to be. Their comment was that even if you knew you were eventually going to create a high-level node it was better to let it be prototyped first.
Favorite Quote: "Artists were able to design complex shader networks while previewing every step of the way, blissfully unaware that they are shader writers."
This year the ET was in the convention center itself. Here are a few highlights from the 20 or so pieces. For readers at EA, we'll be organizing a theater showing of these discs over a few lunches during the next month.
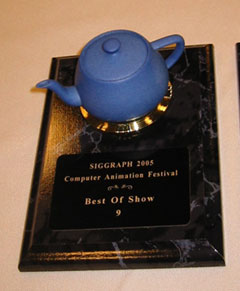
The Best of Show award this year went to "9",
a student piece from UCLA (albeit, a student who was taken time off
to work at WETA on LotR and who got a fellowship from Rhythm &
Hues to work on this piece). It's a simple story ("based on Beowulf")
of a character created from cloth and small knickknacks who takes
his revenge on a mechanical cat. It's beautifully told -- without
words -- and well-directed and animated as you expect from a student
piece. |
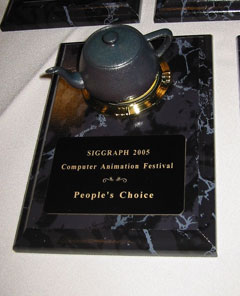
Above: For the first time ever, award winners at the SIGGRAPH Computer Animation Festival received physical plaques! Loren Carpenter at Pixar milled "The Teapot" for us. |
 |
|
| One of the things that really makes this stand out from most student works though, is that it's beautifully modeled, textured, and lit as well. The director, Shane Acker, spoke at a Meet the Artist session, and is great. "9" has gotten interest from a production company and Shane's working on making it into a feature. |
|
|
My favorite piece this year was this humorous short from Taiwan, which also won one of the People's Choice awards. It's got to be the most SIGGRAPH-specific piece of humor ever -- though other than that tidbit, it's pretty hard to describe. One great thing that was true this year as well as last year is that most of the accepted pieces in the Computer Animation Festival were not from the US; we had 25 US entries and 43 from elsewhere (13 from France, 6 from Japan, 5 from UK, 3 from Germany, etc.). |
 |
I thought AT was pretty strong this year, but of course I'm prejudiced! I was the director for Animation Theater (aka the Animation Screening Rooms) this year. I decided to break our 43 accepted pieces up into seven half-hour-long shows so people could easily wander in and out (if you went to the AT this year, I'd love to know what you thought -- it's usually broken up into much longer shows). Here were a few highlights:
 |
In the end, we presented the Animation Theater directly from computer: the A/V operator simply double-clicked on a QuickTime file, and we played back 25 min. of full-res video without a frame drop (well, we did once we sorted out some problems on the first day ;-). This is the first time AFAIK that the Animation Theater has actually presented from a video server -- thanks to my friend Alan Eyzaguirre and Chris Niemietz from Apple Computer for the assistance. We used the new open standard H.264 compressor for about half the programs, and it looks great. It did have some problems with dark purples and dark cyans, so the other half of the program were presented from uncompressed files. |
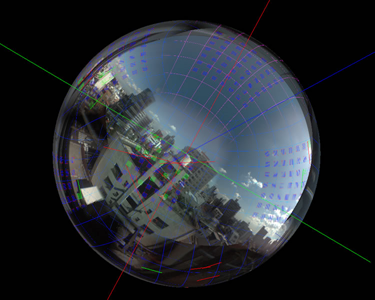
MotionSphere Photogrammetry (Emerging Technologies)This demo from the Inami Laboratory at the University of Electro-Communications in Japan showed using optical flow to stabilize the panoramas from a (commercially available) 5-camera unit that can capture a 180-degree field of view in very high-res real-time. They showed real-time demos of being able to track an object in the field of view; of stabilizing a hand-held camera; and even of stabilizing the image from the camera mounted on a (nerf) baseball bat. If you're interested, definitely watch the video on their website which explains their research pretty clearly. |
 |
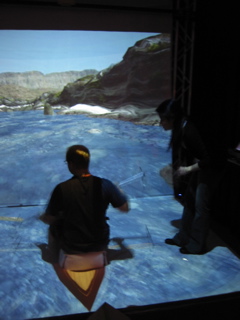 |
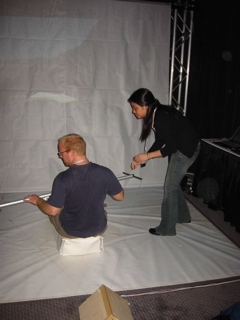
There were two fun exhibits at emerging technologies this year that both involved virtual physical activities. The virtual whitewater kayaking demo was from the Tokyo Institute of Technology (the folks who did Magic Slipper a few years ago). At left is what it looked like to a participant: you were surrounded by a projected environment, and saw your kayak on the water as part of the scene. At right is what was actually happenning: you were seated on a small cushion, holding a metal bar with a T at each end connected to 8 wires. |
 |
The new element in this project was the force feedback in the paddle. Based on the simulated scene, it tried to both sense your force input, and simulate the forces on the paddle. They had several situations where you paddled up to a rock and hit the rock with your virtual paddle.
In general, the simulation of dipping your paddle into the water worked OK, but contacting a solid object like a rock did not. It's just too hard for a force feedback device to ramp up the exerted forces to simulate contact with a solid object -- if anything, it was like you were pushing on a solid object with a fishing rod.
Another fun installation was this virtual hang glide over Rio de Janeiro from Universidade de São Paulo. You actually stepped into a bed very similar to a real hang glider envelope, donned a head-mounted display, and controlled your flight over a model of Rio de Janeiro by moving the hang glider bar back and forth. The projected display you can see in the (fuzzy) picture at right was purely for the benefit of onlookers; the participant was seeing the stereo head-mounted display. This was really fun to do, in fact: you could swoop and dive over the terrain very well. While I liked it, the fact that gravity didn't work like it would in the real hang glider meant that it was easy to become disoriented in it (very much the same problem as playing the game "Descent"). |
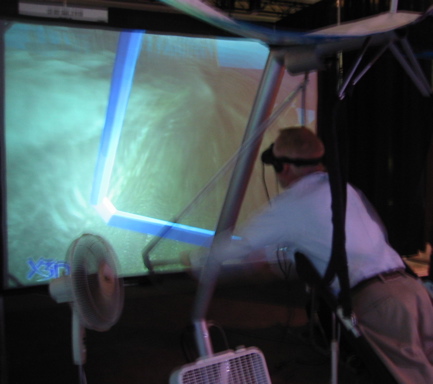 |
The best detail about this installation was the fans. They were there to provide "haptic wind feedback."
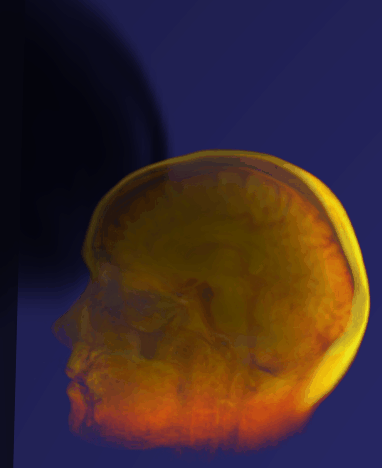 |
I attended the first half of this course mostly to see what my friend Dave Ebert works on. Unfortunately I had to sit through a boring taxonomy section before Dave got up and started talking about the awesome non-photorealistic real-time volume visualization he's been doing for the last few years at his lab at Purdue. The basic idea of real-time volume visualization was championed by MERL and hasn't changed much in the ten years or so since it was first done: given a three-dimensional array of voxel data, decide on an axis to slice the data;turn the slices into textures (possibly combining multiple slices into a single texture); then render the stacked slices as polygons with textures (including opacity data) on your real-time card. At left: an example of the rich data sets used in medical volume visualization, in this case an MRI of the brain that has been stratified into materials and tone-mapped as described below. |
| Dave's lab has been trying to build systems that give control of the visualization process to the practioners themselves (whether in medical, scientific, or other fields) rather than requiring the intervention of a visualization specialist to pull out the details. They have been experimenting with implementing various NPR techniques like silhouette enhancement, phong/tone shading, aerial perspective, etc., etc. (they've even done quite a bit with stippling). They know that most of these were easy to implement on modern shader programs. At right is a "davinci sketch" style they defined at one point illustrating turbulent fluid flow. | 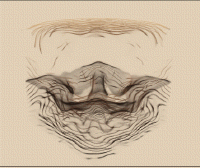 |
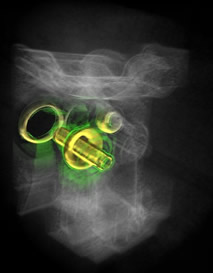
So, one day, they realized they should just implement them all: they provide a system that maps inputs to output through named transfer functions. The user sets up a cascade of transfer functions, and their application then gnerates and compiles shader source code into a fragment shader to run on that part of the data. For the most part, they don't transform the raw volume data in the CPU at all now: they just compile the appropriate fragment shader whenever the user changes options. They can apply sketch look, edge enhancement, shaded/transparent, tone mapping, aerial perspective, etc. transfer functions in any combination by creating and compiling the shader at runtime. For instance, compare the original volume visualization below left to the tone-mapped, edge-enhanced version at below right.
 |
 |
 |
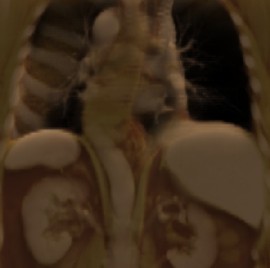
Having that system black-boxed has allowed them to focus more on the upstream issue, like how to tease out different real-world substances from the volume data. They showed a neat finding: if you look at a histogram of the density found by the sensor versus the gradient of the density, it's usually easy to see the different materials (e.g., bone vs. muscle vs. fat). Using that technique, a practioner can easily identify the materials, and then use their NPR visualizations to say, for example, "Apply white sketch to everything except bone and brain; bone is pale yellow shaded, and brain is red." At left they used this system to pull out the most interesting parts of an engine block scan. Again, all the images in this section are rendered interactively on a PC and every rendering parameter is tweakable in real-time. |
This course talked about the preproduction, concept art, prototyping, and initial development efforts that went into the motion picture Madagascar. It was very relevant to any project doing preproduction and attempting to get a well-defined visual style to the screen. I caught only half of the course, but that included three presentations from different members of the leadership team on the film about their part of the process. Below are some of what each person had to say.
My job: translate the art to the screen, and track key technical challenges
Big challenges:
Lighting
Special Effects -- Pure Fantasy!
Here are just a couple noteworthy comments from Scott's talk:
Kobito Virtual Brownies (Emerging Technologies)This was a cute little augmented reality installation from Tokyo Institute of Technology. |
 |
There were a couple small items on a tabletop. You could see and touch them, but in addition there was an LCD screen which showed a virtual view of the scene. In the virtual scene, you could see the Brownies -- cute little elf-like creatures that were running around on the desktop. The brownies would periodically run up to the box and push it around -- and the box was instrumented with some under-table magnets so that the virtual brownies could push around the (real) box. Like a lot of things in emerging technologies, I'm not sure what's it's good for, but it was a cute idea. The only real problem with it was that your physical hand often got in the way of seeing where the virtual brownies were supposed to be -- to make the installation work as intended, you had to reach in unnaturally from the top.
Endorphin from Natural Motion (Exhibition) |
Endorphin has gotten a fair amount of attention the last couple years. Although I've heard about the product before, this was the first year I got to sit down with them and go through it. Endorphin is an implementation of skeletal dynamics: it knows how to simulate motion of a skeleton based on applying muscle forces to joints in order to react to input conditions, or in order to try and reach target positions. Here's the link for their website.
The most obvious use of skeletal dynamics is for collision response. In a football tackle, for instance, you would start with pre-authored animations that have the ball carrier running, and the defensive player beginning a tackle. But at the moment of contact, you would blend into Endorphin's physics-based system to resolve the results of the (attempted) tackle. Endorphin would take into account the momentum and the muscle strength you set up for the two players to produce a unique animation for this situation.
A similar example in a martial arts context is that Endorphin can simulate the effect of a punch based on the specific point at which the punch lands -- it will actually make a skeleton respond differently it it's punch in the right shoulder as opposed to lower on the rib cage.
They showed off a bunch of new capabilities for Endorphin 2.0, including a new behavior called "Balance" that enables a bipedal character to try and maintain its balance (for instance, when punched as per above). It's a neat program, but for real-time use it's not clear how to integrate it. They don't claim that their runtime solver is fast enough to necessarily include in a real-time application, and without that component, even if you authored a bunch of animations in Endorphin, you'd need to re-export them to use in a real-time application. It's clearly useful already for linear-media applications though, where it can generate physically accurate results that would be painful to animate by hand.
For the last couple years, there's been a meeting at SIGGRAPH presenting the latest developments about the Collada file format. For a good introduction to the Collada project, go to the website: it's basically an open-source, XML-based file format for the interchange of 3D information. It's mostly oriented to the information required for games, which is why I've been tracking it since it was announced.
There wasn't a huge amount of new information at the session this year (Jon Peddie gave a content-free introduction), but I got a few interesting tidbits.
This paper from ILM had some interesting implications. Essentially the idea is explored is this: you have a simulation that's running on a very low-resolution grid, and you can't afford to run it on a finer grid. But, in a few areas, you'd like to have much better resolution. So, you introduce particles into the areas of interest and let the particles flow along their own simulation path. When you render, you combine the renderings of the volume field and the particles to create the final image.
While right now this is definitely in the domain of the filmmakers, the idea of combining a low-resolution physical simulation with particles to get the important details where it counts could definitely be relevant for introducing physical simulations to real-time projects. Though actually... this paper wasn't about that. Still strimulating.
The problem they are working on is how to maintain constant volume in a model of a particular muscle (and they're trying to do it in real-time). In essence, this is the inverse of how skeletons really work: rather than having the muscles drive the skeleton, they're trying to infer shape change in the muscle from the joint data (mocap in their example).
A bunch of people have done work like this by taking the sculpted shape as a rest state and treating the polymesh as a mass-spring system trying to maintain that shape. Naively implemented, that doesn't work well. What this sketch did was two further improvements: first, they ran a spine down the major axis of the muscle, divided it into an integer number of major segments, and added additional springs connecting each vert in the mesh to one of the nodes on the spine. This helped maintain global shape of the muscle.
Secondly, they added weight scalar fields to control the area of applicability of particular external forces -- i.e., they can say that "for forces coming from the elbow, the deformation is mostly in this part of the mesh." Thus, in essence, the way they get local deformation is via sculpting on the part of the modeler as expressed in these weight fields.
They use an implicit method for finding the deformation while maintaining volume of polygonal mesh. Now, so far, this sounds like a non-real-time film-industry technique, but in fact their method runs in 0.0013 sec per frame for a 1K vertex triangulated mesh. That's really what I learned from this sketch: for modest-sized meshes (like the control mesh of a subD?) running a dynamics step in real-time is not a particularly big challenge for modern CPUs. That makes me think muscle-and-skin deformation models will be practical in games, especially on next-gen consoles where extra vector processors are likely to be available for highly regular tasks like this.
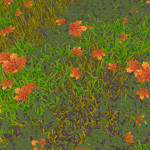 |
So, there's a neat vertex shader hack embedded in this sketch, although I'm not sure how actually useful it is (I believe the author said he worked on Elder Scrolls: Oblivion, but this work was not used in that title). The problem he's addressing is how to draw landscapes full of "ground stuff" (i.e., grasses, flowers, weeds, etc.). In a typical film or game situation, while you want a lot of that stuff around, and definitely don't want to be forced to go hand-place each one, you also need a lot of control of where some of the ground stuff is: you don't want it on paths, in clearings where you're putting another object, where a character is standing, etc. |
His solution was to first, construct low-poly representations of the various ground stuff you want to draw, all with the same number of verts (he used 8 tris per plant). The textures for these plants are combined onto a single texture sheet.
Next, he prepares a distribution map by first, seeding a lot of random points onto the UV plane; second, drawing a Voronoi diagram around them; and coloring the map with a map-coloring algorithm where each color corresponds to a plant type. When accessing this map he introduces UV-space noise so that the plant types fade into each other with overlap and small islands of the minority plant type.
The hack is that the geometry block is completely constant: it's pretty much all dummy data (the input vertex data is all ignored except for the origin of this plant, a sequence number for which plant, and for which vertex of the plant). The actual vertex data for each plant type is passed as constant arguments to the vertex shader. In the vertex shader, it looks up in the distribution map what type of plant it is, and overwrites the vertex data with the appropriate data from the constant input arguments before sending it down to the fragment shader.
That's kind of a neat hack (not deciding what your geometry actually is until you're in the vertex shader), but I must have missed something about why it's useful (I came in a few minutes late to this so that's possible): as near as I can tell, you could preprocess the distribution map to build a vertex data block that had the actual vertex data in it without any increase in memory usage (in fact it would go down because you wouldn't need the distribution map at runtime). Now, if a vertex shader could manufacture new vertices this technique would be neat, but AFAIK that's not possible yet...
He mentioned this also needs extending to work with tiling, and to have a medium-distance LOD (this is the close LOD, and for far elements you can probably reduce it to a texture drawn on top of the terrain, but you want something in the middle distance). He also didn't talk extensively about lighting, but mentioned that someone he was talking to had implemented a scheme like this where each plant was lit by a constant lighting value drawn from a noise based on location. The result was a varied set of lighting across the plants which he said looked really good (but didn't show).
This course attempted to take you through the steps to implementing a digital creature (humanoid or otherwise) in the course of a CG production. If you click here, you'll go to a brief outline of the early steps he described. While I'm glad he's promoting these best practices, certainly if you've ever worked at one of the high-quality providers, either in games, TV, or film, you've seen this pipeline followed (if you haven't: read and learn!). Also, far too much time was spent defining terms (I'm familiar with the temptation to spend time defining words at the beginning of a course... but it must be resisted!).
The one thing I got from this course was a reference work he mentioned: "Vertebrates: Comparative Anatomy, Function, Evolution" by Kevin Kardong. Hmm, I may have to get that...
This was a nice paper, especially with their other paper from Eurographics this year about animating fluids around deforming meshes. It explains how to run a standard fluid solver around highly irregular shapes (they blow smoke through the Stanford dragon) without having your simulation times explode.
However, in general, it reminded me of why I don't go to paper presentations: a whole lot of math, and you could just read the paper afterwards. Also, it wasn't especially applicable to anything real-time. The other two papers in this session ("Discontinuous Fluids" and "Water Drops on Surfaces") were similar. It's too bad, I was hoping for more "on the verge of real-time" stuff.
The new high-end Sony VAIO laptops have an LCD technology called XBRITE. It's amazing, probably the most beautiful computer display I've ever seen; it's almost like they're a built-in high-dynamic-range monitor. The laptops are bricks, but man is the screen nice.